Inject Vitamin B12 How to Give B12 Injections at Home to Yourself · PA Relief
Introduction: When you need to inject vitamin b12 at home, the stakes feel personal
If you’ve ever stared at a prescription box, a vial, and a syringe—then hesitated—your concern makes sense. Vitamin B12 injections can be life-changing for people who have pernicious anemia or other causes of B12 deficiency, but giving yourself shots at home can feel intimidating the first few times. In this guide, I’ll walk you through exactly how to inject vitamin b12 safely at home, with practical technique details, what to watch for, and how to reduce common mistakes.
I’m going to keep this grounded in real-world workflow: what I look for on injection day, how I prep, and the small details that prevent pain, leaks, and missed dosing.
Before you inject: confirm the essentials (and know when not to proceed)
At home or in a clinic, the goal is the same: deliver the right medication dose into the correct tissue safely. Before you inject vitamin b12, confirm these items in your hands-on routine:
1) Verify the prescription and formulation
- Medication name and concentration: Match the vial/ampule exactly to your prescription.
- Route: Most home protocols for B12 are intramuscular (IM) injections, but your prescriber may specify a different route.
- Dosing schedule: Some regimens start more frequently; others are maintenance doses. Follow your prescriber’s plan.
2) Check your injection supplies
- Sterile syringe(s) and needle(s) as prescribed
- Alcohol wipes
- Sharps container (or an approved puncture-resistant disposal option)
- Bandage or gauze
- Your B12 vial/ampule and any diluent if your product requires it
3) Don’t inject if the vial is questionable
I treat vial integrity as non-negotiable. If the liquid looks unexpected for that product (cloudy when it should be clear, unusual particles, damaged packaging, or an expired date), pause and contact your pharmacy or prescriber for guidance.
4) Know the “pause and call” situations
Stop and seek medical advice promptly if you have:
- Severe allergic symptoms (hives, swelling, trouble breathing)
- Signs of infection at an injection site (worsening redness, warmth, pus, fever)
- Significant bleeding that doesn’t stop or severe bruising after minor technique adjustments
Choose the right site: where to inject vitamin b12
For intramuscular injections, site selection matters for comfort, absorption, and minimizing irritation. The most commonly used sites for home IM B12 injections are the upper outer buttock and the thigh (depending on your specific prescription and your clinician’s guidance).
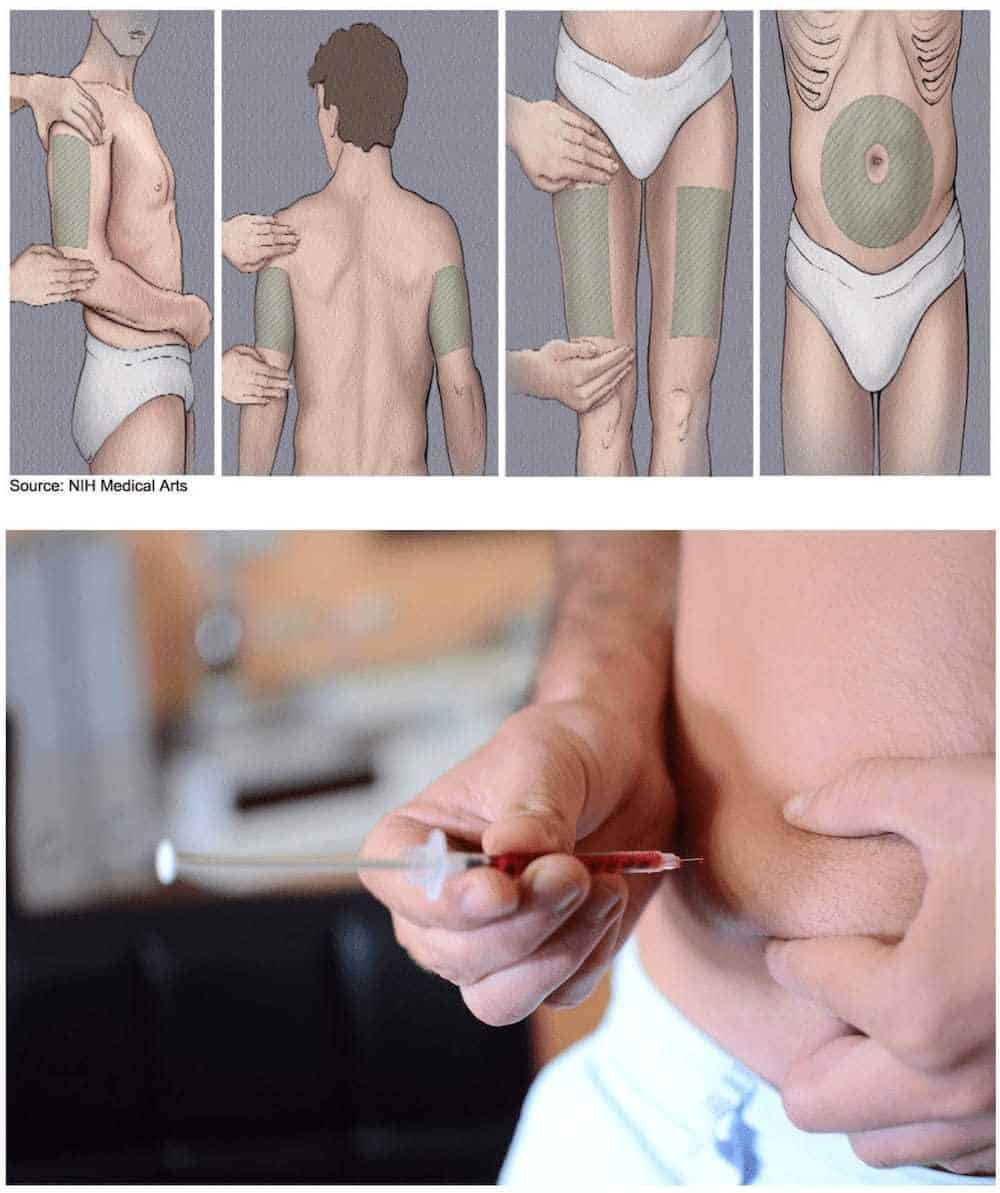
Upper outer buttock (dorsogluteal region)
- Commonly used for IM injections when taught with proper landmarking.
- I recommend using the same landmarking method every time to reduce risk of injecting too high/low.
Thigh (vastus lateralis)
- Often more accessible for self-injection at home.
- In my experience, many people find the thigh technique less “awkward” on injection day.
Rotation is a comfort strategy
If you inject on a schedule, rotating injection sites helps reduce repeated local irritation. I usually note which side I used and which area of the site went in last time so I don’t accidentally repeat the exact spot.
Step-by-step: how to inject vitamin b12 safely at home
Below is a practical workflow I’ve used and refined with patients and caregivers. Always follow your prescriber’s specific instructions for your medication and device type.
Step 1: Prepare your workspace
- Wash your hands thoroughly.
- Lay everything out on a clean surface so you don’t hunt for supplies mid-procedure.
- Use good lighting. I’ve seen “missed” landmarks simply from poor visibility.
Step 2: Inspect the vial and medicine
- Confirm it’s the correct B12 product.
- Check expiration date.
- If your formulation requires mixing, prepare exactly as instructed.
Step 3: Prepare the syringe
- Use aseptic technique—avoid touching the needle or the parts that contact the medication.
- Draw up the prescribed dose.
- Remove air bubbles carefully, consistent with standard injection practice.
Step 4: Select and clean your injection site
- Pick the site you’ve been instructed to use.
- Clean the area with an alcohol wipe.
- Let it dry. Patting it dry too quickly can reintroduce germs from hands or surfaces.
Step 5: Position your body
Muscle relaxation reduces discomfort. If you’re injecting the thigh, keep the leg relaxed. If you’re injecting the buttock area, find a stable position that lets you access the spot without twisting.
Step 6: Inject
- Use the needle size and technique your prescriber taught you.
- Insert into the muscle using a steady, controlled motion.
- Inject the medication at a pace that feels controlled for you—consistency matters more than speed.
Tip I use: I tell people to focus on “steady and smooth,” because jerky movements tend to increase soreness and bruising.
Step 7: Withdraw and apply pressure
- Remove the needle carefully.
- Apply gentle pressure with gauze or a clean cotton pad.
- Use a bandage if needed.
Step 8: Dispose immediately
- Place the needle and syringe into a sharps container right away.
- Don’t recap needles unless your clinician/pharmacy specifically instructed a technique that’s safe for your situation.
What to expect after you inject vitamin b12
Some local effects are common, especially early on. In my experience, many people worry because they expect “nothing to happen,” but mild soreness can be normal.
Normal or expected
- Light soreness or tenderness at the injection site
- Small bruise
- Mild redness that fades
When to call your clinician
- Increasing redness, swelling, or warmth after the first day
- Severe pain that doesn’t improve
- Drainage/pus, fever, or feeling unwell
Tracking helps reduce future problems
I strongly recommend keeping a simple injection log: date, dose, site used (e.g., right thigh, left buttock upper outer), and any side effects. This makes it far easier to troubleshoot patterns—like repeated soreness in the same area.
Common mistakes (and how to avoid them)
Here are the recurring issues I’ve seen when people start learning to inject vitamin b12 at home, along with practical fixes.
- Rushing preparation: Leads to contaminated supplies or incorrect dosing. Slow down during drawing up the dose.
- Not letting alcohol dry: Can sting more and irritate tissue. Let the area air-dry.
- Reusing the same spot: Builds localized discomfort. Rotate sites and track your pattern.
- Incorrect landmarking: In the buttock region especially, landmarks matter. If you feel uncertain, ask your clinician for a refresher demonstration before continuing.
- Improper disposal: Causes sharps safety risks. Use a proper sharps container from day one.
FAQ
How often should I inject vitamin B12 at home?
It depends on your diagnosis and the specific regimen your prescriber gave you. Some schedules are more frequent initially, then transition to maintenance dosing. Follow your prescribed timetable rather than a general guideline.
What needle size or site should I use for intramuscular B12?
Your prescriber or nurse should choose the needle length and the site based on your body size, the medication formulation, and the intended injection technique. Use the exact guidance given for your prescription rather than switching based on convenience.
Is it safe to inject vitamin B12 myself if I’m nervous?
Yes, many people successfully learn self-injection, but the key is proper technique and confirmation. If you’re very uneasy, start by requesting hands-on instruction (in person or with a video demonstration plus a live check) before you begin doing it fully on your own.
Conclusion: Your next step is a “practice-first” injection routine
Injecting vitamin B12 at home is manageable when you treat it like a careful procedure: confirm the medication and dose, choose the correct site, clean properly, inject with steady technique, rotate sites, and dispose of sharps immediately. The biggest difference I’ve seen between “painful and stressful” and “routine and controlled” is not luck—it’s preparation and consistent technique.
Next step: Make a one-page injection checklist for your exact B12 prescription (dose, schedule, site, supplies) and do one “dry run” of your setup and positioning—then inject only when everything matches your checklist.
Discussion